

Technical Support FAQ
Feel free to contact us at any time for assistance - we're happy to help!
We encourage you to first explore the following list of frequently asked questions. There's a pretty good chance you'll find your answer here and it's the fastest way to get help.
- Which browser is best to use with CMASAS systems?
Regardless of which browser you use, make sure you're using the latest version of Adobe Flash Player.
However, we recommend the most updated version of Mozilla Firefox, or Google Chrome. To ensure you're using the most recent version visit Google Chrome or Mozilla FireFox.- I forgot my username and/or password.
Please fill out the username/password recovery form. We will send you a username reminder or information on how to reset your password.
- How do I clear my cache and cookies?
Mozilla Firefox
- Open Firefox.
- Click the three lines in the top-right corner and select "Settings".
- Click on the "Privacy & Security" tab.
- Scroll down and click the "Clear Data" button under the Cookies and Site Data section.
- Check both boxes and click "Clear".
- Close the browser, reopen it, and return to www.cmasas.org.
Google Chrome
- Open Chrome.
- At the top-right of your window, click the three dots.
- Hover over "More Tools" and click the “Clear browsing data…” button.
- Choose “All time” in the Time range dropdown menu.
- Check every box except "Passwords and other sign-in data".
- Click the "Clear data" button.
- Close the browser, reopen it, and return to www.cmasas.org.
Microsoft Internet Explorer 8 or later
- Go to "Safety" on the menu bar.
- Choose "Delete Browsing History".
- Check all of the boxes.
- Press "Delete", the dialog box will close when the process is completed.
- Close the browser, reopen it, and return to www.cmasas.org.
Safari
- Open Safari.
- Go to Safari > Settings, then click "Privacy".
- Click "Manage Website Data".
- Click "Remove All".
- Quit the browser, reopen it, and return to www.cmasas.org.
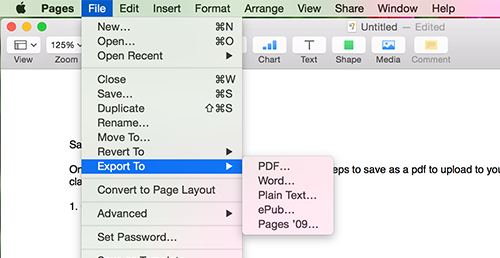
- How do I save a Pages document to a PDF document?
Once you have your document complete go to the following menu:
Follow the directions in the pop-up window.File > Export To > PDF...
- Why can't I submit an assignment in Buzz?
If you can access your course in Buzz, but are unable to submit any assignments because the "open" or "submit" button is missing or grayed out, this means that your expiration date has passed for the course. Please contact your PEC and ask them to extend your end date.
- What is the best type of microphone to use with Rosetta Stone?
Rosetta Stone® speech-recognition technology is a key element of our language-learning solution. In order to utilize this feature, you'll need a USB device equipped with a microphone: either a USB headset or USB earbuds.
- How do I setup my microphone to use with Rosetta Stone?
Please follow the steps below.
- Select the correct microphone from the "Microphone Selection" screen. Your device may be listed as C-Media USB Audio Device, USB VoIP Device or another USB Device.

Note: If you don't see the name of your device in the hardware list, click the "Refresh List" button. If you still do not see the correct device, you may need to reboot your system with the USB headset attached in order to see the device. - Click "Continue" once your USB headset is selected.
- Speak into the microphone in a normal tone. Say "1, 2, 3, 4, 5." If your setup wasn't successful, click "Repeat Setup" and try again.
- Click "Continue" to start your Course, once your microphone is set up properly.
The screenshot below displays the microphone setup screen.
- Select the correct microphone from the "Microphone Selection" screen. Your device may be listed as C-Media USB Audio Device, USB VoIP Device or another USB Device.
- I am using Chrome and Rosetta Stone can't find my microphone, how do I fix this?
Google Chrome does not have permission to access your microphone and camera for the Rosetta Stone website. To grant Google Chrome access, please follow the steps at this website: https://support.rosettastone.com/en/k-12/Foundations/articles/How-to-Select-Your-USB-Headset-as-the-Default-Device-on-Chrome-Operating-System
- How do I configure my microphone in Mac OS X?
For best results, use a USB device: either a USB headset or USB earbuds equipped with a microphone.
- Plug your device into an available USB Port.
- Click the Apple icon on the upper-left corner the screen.
- Select "System Preferences".

- Click on the Sound icon (located on the far right of the Hardware row).

- Click the "Output" tab.
- Select your USB headset as the output device. It may be listed as C-Media USB Audio Device, USB VoIP Device, or other USB device.
- Adjust the Output volume to 30%.

- Click on the Input tab and select your USB device as the input device. The device will have the same name as the one you selected in the output tab.
- Adjust the input volume to 50%.
- Close the Sound window.
- Can I access Rosetta Stone on my iPad or tablet?
Yes Rosetta Stone offers an app from most devices
To get started using Rosetta Stone on your mobile device now, follow these steps:
- Go to the App Store for your mobile device and download the "Learn Languages: Rosetta Stone by Rosetta Stone, Ltd.

- After installing the Learn Languages application, open the app on your device.
- Tap the "Enterprise and Education Learners" option.
- Here you can enter your username, password and Online Portal. The CMASAS portal is cmacademy.
- After entering your username, password, and Online Portal, tap "Sign In".
- You will be prompted to allow Rosetta Stone access to your device's microphone. You should see an initial message containing this request: "Rosetta Stone Would Like to Access the Microphone". Selecting "OK" will enable speaking activities in the application; selecting "Don't Allow" will disable all speaking activities. You will want to select "OK".
- You will have access to all the activities available in Language Training, with the exception of the Writing and Milestone activities.
*Note: The time that you spend in the Learning Languages mobile application will be counted in your program usage report. The progress that you make in this app will sync with your online account, and vice versa.
- Go to the App Store for your mobile device and download the "Learn Languages: Rosetta Stone by Rosetta Stone, Ltd.
- Why can I only see the front cover on my Glencoe textbook?
When an Online Student Edition is initially accessed, only the cover of the book will be loaded. To access subsequent sections you will need to use the Bookmarks tab found on the left hand side of the window the book opened in. If you do not see this tab, look for a blue ribbon icon on the extreme left hand side of the window. If the Bookmarks tab is still not accessible or the links within this tab do not function, see instructions below:
Windows:
- Internet Explorer, Firefox, and Google Chrome are supported. The only additional requirement will be to download the latest version of Adobe Reader which is available at www.adobe.com
- Internet Explorer 9 may have compatibility issues with Online Student Editions, depending on settings/group policy. If an issue is encountered using Internet Explorer 9, try Firefox.
- Firefox has recently added its own PDF viewer, to view our book please change your settings to open the PDF with Adobe Reader in Firefox. (Tools > Options > Applications > scroll through the list and find "Portable Document Format" , out on the right - click "Use Adobe Acrobat in Firefox" **Click OK*)
- Google Chrome may require adjusting some settings to allow for complete functionality. In the address bar of Chrome type: about:plugins . This will bring up an options menu, disable Chrome PDF viewer and enable Adobe PDF plugin and select always allow. Close the browser and try to access the book again.
Mac OS X:
The steps necessary to view Online Student Editions will be dependent upon what browser you are using. See instructions below:Firefox:
- Download the most recent version of Firefox, available at: www.mozilla.org
- Download the latest version of Adobe Reader, available at: get.adobe.com/reader
Chrome:
- Google Chrome may require adjusting some settings to allow for complete functionality. In the address bar of Chrome type: about:plugins . This will bring up an options menu, disable Chrome PDF viewer and enable Adobe PDF plugin and select always allow. Close the browser and try to access the book again.
Safari:
- Download a PDF Browser Plug-In**. Install the plugin specific to your version of OSX.
- Continue through the installation. When complete attempt to view the book again. You may be prompted for license information. Select 'For Education Only'.
If you are still having difficulty review the steps below:
- Ensure Safari is running in 32 bit mode by opening finder and search for the Safari application. Once you have located the Safari application, highlight the icon by clicking on it once, then hold the command key and the letter "I" simultaneously to open the information pop-up. Under the general tab, select open in 32 bit mode.
- Set the PDF Browser Plug-in as your default PDF viewer by opening finder. Search for .PDF to locate a PDF file on your hard drive. Highlight this file by clicking on it once, then hold the command key and the letter "I" simultaneously to open the information pop-up.
** We cannot support the installation or use of this plug-in, nor can we guarantee that it will resolve the issue in all cases.**